No products in the cart.
How To
9 Ways To Make Fire Without Matches
At Doomsday Prep we are always scouring the net for great articles that encompass and bestow a great deal of knowledge in a timely manner that is to the point. This article was forwarded to us by a reader and we feel we should share it with the community. Without further ado, we give you 9 Ways to Make Fire Without Matches!
There is a primal link between man and fire. Every prepper should know how to start a fire with the resources around them, even if that means creating fire without a match or lighter. This is an essential survival skill as you never know when you’ll find yourself in a situation where you’ll need a fire, but you don’t have matches. Maybe your single engine plane goes down while you’re flying over the Alaskan wilderness, like the kid in Hatchet. Or perhaps you’re out camping and you lose your pack. It need not be something as dramatic at these situations-even extremely windy or wet conditions can render matches virtually uselessly. And whether or not you ever need to call upon these skills, it’s nice to know you can start a fire, whenever and wherever you are.
Friction-Based Fire Making
Friction based fire making is not for the faint of heart. It’s probably the most difficult of all the non-match based methods. There are different techniques you can use to make a fire with friction, but the most important aspect is the type of wood you use for the fire board and spindle.
The spindle is the stick you’ll use to spin in order to create the friction between it and the fireboard. If you create enough friction between the spindle and the fireboard, you can create an ember that can be used to create a fire. Cottonwood, juniper, aspen, willow, cedar, cypress, and walnut make the best fire board and spindle sets.
Before you can use wood to start a friction based fire, the wood must be bone dry. If the wood isn’t dry, you’ll have to dry it out first.
The Hand Drill
The hand drill method is the most primitive, the most primal, and the most difficult to do All you need is wood, tireless hands, and some gritty determination. Therefore, it’ll put more hair on your chest than any other method. Here’s how it’s done:
- Build a tinder nest. Your tinder nest will be used to create the flame you get from the spark you’re about to create. Make a tinder nest out of anything that catches fire easily, like dry grass, leaves, and bark.
- Make your notch. Cut a v-shaped notch into your fire board and make a small depression adjacent to it.
- Place bark underneath the notch. The bark will be used to catch an ember from the friction between the spindle and fireboard.
- Start spinning. Place the spindle into the depression on your fire board. Your spindle should be about 2 feet long for this to work properly. Maintain pressure on the board and start rolling the spindle between your hands, running them quickly down the spindle. Keep doing this until an ember is formed on the fireboard.
- Start a fire! Once you see a glowing ember, tap the fire board to drop you ember onto the piece of bark. Transfer the bark to your nest of tinder. Gently blow on it to start your flame.
Fire Plough
- Prepare your fireboard. Cut a groove in the fireboard. This will be your track for the spindle.
- Rub! Take the tip of your spindle and place it in the groove of your fireboard. Start rubbing the tip of the spindle up and down the groove.
- Start a fire. Have your tinder nest at the end of the fireboard, so that you’ll plow embers into as you’re rubbing. Once you catch one, blow the nest gently and get that fire going.
Bow Drill
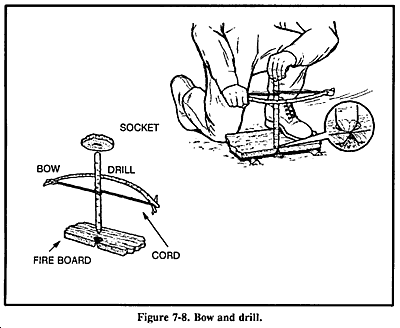
The bow drill is probably the most effective friction based method to use because it’s easier to maintain the speed and pressure you need to create enough friction to start a fire. In fact, we wrote an entire article on how to make fire with a bow drill with video instructions. In addition to the spindle and fireboard, you’ll also need a socket and a bow.
- Get a socket The socket is used to put pressure on the other end of the spindle as you’re rotating it with the bow. The socket can be a stone or another piece of wood. If you use another piece of wood, try to find a harder piece than what you’re using for the spindle. Wood with sap and oil are good as it creates a lubricant between the spindle and the socket.
- Make your bow. The bow should be about as long as your arm. Use a flexible piece of wood that has a slight curve. The string of the bow can be anything. A shoelace, rope, or strip of rawhide works great. Just find something that won’t break. String up your bow and you’re ready to go.
- Prepare the fireboard. Cut a v-shaped notch and create a depression adjacent to it in the fireboard. Underneath the notch, place your tinder.
- String up the spindle. Catch the spindle in a loop of the bowstring. Place one end of the spindle in the fireboard and apply pressure on the other end with your socket.
- Start sawing. Using your bow, start sawing back and forth. You’ve basically created a rudimentary mechanical drill. The spindle should be rotating quickly. Keep sawing until you create an ember.
- Make your fire. Drop the ember into the tinder nest and blow on it gently. You got yourself a fire.
Flint and Steel
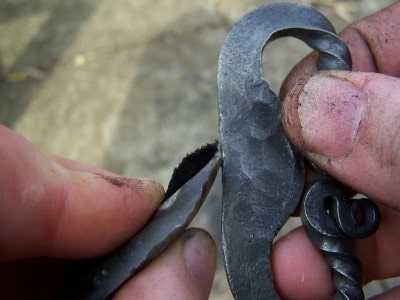
This is an old standby. It’s always a good idea to carry around a good flint and steel set with you on a camping trip. Matches can get wet and be become pretty much useless, but you can still get a spark from putting steel to a good piece of flint. Sweedish Firesteel-Army model is a good set to use.
If you’re caught without a flint and steel set, you can always improvise by using quartzite and the steel blade of your pocket knife (You are carrying your pocket knife, aren’t you?). You’ll also need char. Char is a cloth that has been turned into charcoal. Char catches a spark and keeps it smoldering without bursting into flames. If you don’t’ have char, a piece of fungus or birch will do.
- Grip the rock and char cloth. Take hold of the piece of rock between your thumb and forefinger. Make sure an edge is hanging out about 2 or 3 inches. Grasp the char between your thumb and the flint.
- Strike! Grasp the back of the steel striker or use the back of your knife blade. Strike the steel against the flint several times. Sparks from the steel will fly off and land on the char cloth, causing a glow.
- Start a fire. Fold up your char cloth into the tinder nest and gently blow on it to start a flame.
Granted, if you don’t have a huge chunk of flint or a fire starter kit, we have you covered. Check a few flint & steel firestarters below.
Lens-Based Methods
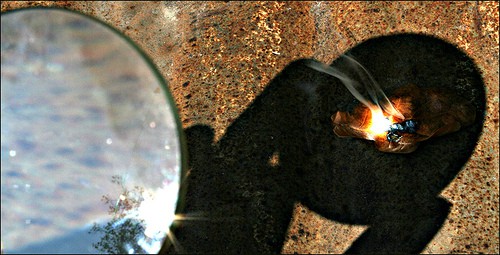
Using a lens to start a fire is an easy matchless method. Any boy who has melted green plastic army men with a magnifying glass will know how to do this. If you have by chance never melted green plastic army men, here’s how to do it.
Traditional Lenses
To create a fire, all you need is some sort of lens in order to focus sunlight on a specific spot. A magnifying glass, eyeglasses, or binocular lenses all work. If you add some water to the lens, you can intensify the beam. Angle the lens towards the sun in order to focus the beam into as small an area as possible. Put your tinder nest under this spot and you’ll soon have yourself a fire.
The only drawback to the lens-based method is that it only works when you have sun. So if it’s night time or overcast, you won’t have any luck.
In addition to the typical lens method, there are three odd but effective lens-based methods to start a fire as well.
Balloons and Condoms
By filling a balloon or condom with water, you can transform these ordinary objects into fire creating lenses.
Fill the condom or balloon with water and tie off the end. You’ll want to make it as spherical as possible. Don’t make the inflated balloon or condom too big or it will distort the sunlight’s focal point. Squeeze the balloon to find a shape that gives you a sharp circle of light. Try squeezing the condom in the middle to form two smaller lenses.
Condoms and balloons both have a shorter focal length than an ordinary lens. Hold them 1 to 2 inches from your tinder.
Fire from Ice
Fire from ice isn’t just some dumb cliché used for high school prom themes. You can actually make fire from a piece of ice. All you need to do is form the ice into a lens shape and then use it as you would when starting a fire with any other lens. This method can be particularly handy for wintertime camping.
Get clear water. For this to work, the ice must be clear. If it’s cloudy or has other impurities, it’s not going to work. The best way to get a clear ice block is to fill up a bowl, cup, or a container made out of foil with clear lake or pond water or melted snow. Let it freeze until it forms ice. Your block should be about 2 inches thick for this to work.
Form your lens. Use your knife to shape the ice into a lens. Remember a lens shape is thicker in the middle and narrower near the edges.
Polish your lens. After you get the rough shape of a lens, finish the shaping of it by polishing it with your hands. The heat from your hands will melt the ice enough so you get a nice smooth surface.
Start a fire. Angle your ice lens towards the sun just as you would any other lens. Focus the light on your tinder nest and watch as you make a once stupid cliché come to life.
The Coke Can and Chocolate Bar
I saw this method in a YouTube video a while back ago and thought it was pretty damn cool. All you need is a soda can, a bar of chocolate, and a sunny day.
Polish the bottom of the soda can with the chocolate. Open up your bar of chocolate and start rubbing it on the bottom of the soda can. The chocolate acts as a polish and will make the bottom of the can shine like a mirror. If you don’t have chocolate with you, toothpaste also works.
Make your fire. After polishing the bottom of your can, what you have is essentially a parabolic mirror. Sunlight will reflect off the bottom of the can, forming a single focal point. It’s kind of like how a mirror telescope works.
Point the bottom of the can towards the sun. You’ll have created a highly focused ray of light aimed directly at your tinder. Place the tinder about an inch from the reflecting light’s focal point. In a few seconds, you should have a flame.
While I can’t think of any time that I would be in the middle of nowhere with a can of Coke and chocolate bar, this method is still pretty cool.
Fire from Batteries and Steel Wool
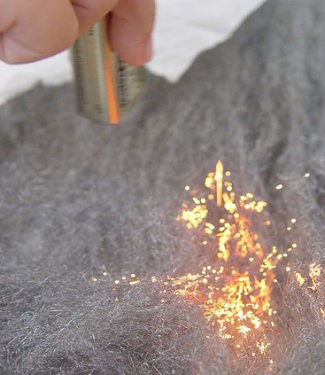
Like the chocolate and soda can method, it’s hard to imagine a situation where you won’t have matches, but you will have some batteries and some steel wool. But hey, you never know. And it’s quite easy and fun to try at home.
- Stretch out the Steel Wool. You want it to be about 6 inches long and a ½ inch wide.
- Rub the battery on the steel wool. Hold the steel wool in one hand and the battery in the other. Any battery will do, but 9-volt batteries work best. Rub the side of the battery with the “contacts” on the wool. The wool will begin to glow and burn. Gently blow on it.
- Transfer the burning wool to your tinder nest. The wool’s flame will extinguish quickly, so don’t waste any time.
Does our prepping community know other ways to start a fire? Always give us ideas in the comments below.


